Heute darf ich euch wieder einen neuen Gast in der kleinen Tutorial-Serie meiner wunderbaren Tester vorstellen! Beatrice von @phantasievoll.kreativ hat Mistletoe für mich getestet und ein wunderschönes Projekt daraus gezaubert. Für euch hat sie ihr Vorgehen inklusive Maßen und Zuschnitt aufgeschrieben. Vielen Dank für deinen Beitrag, Beatrice!
Today I get to introduce to you another one of my amazing testers! Beatrice @phantasievoll.kreativ tested Mistletoe and came up with a beautiful project. She wrote down her process for you, including measurements and cutting instructions. Thank you Beatrice!
Hallo,
ich heiße Beatrice und ich war eine der Glücklichen, die für Steffi ihre FPP-Vorlagensets „Mistletoe“ und „Cedar“ testen durfte. Die FPP-Blöcke habe ich zu einem XL-Placemat für meine Weihnachtsdeko vernäht.
Wenn euch das Endergebnis gefällt, dann findet ihr hier ein kleines Tutorial für das XL Placemat. Viel Spaß damit!
Hi!
My name is Beatrice and I was one of the lucky ones who got to test Steffis new FPP template sets "Mistletoe" and "Cedar". I decided to turn the FPP blocks into an XL placemat for my Christmas decorations.
Here is a little tutorial, showing how I did that! I hope you enjoy sewing your own version!
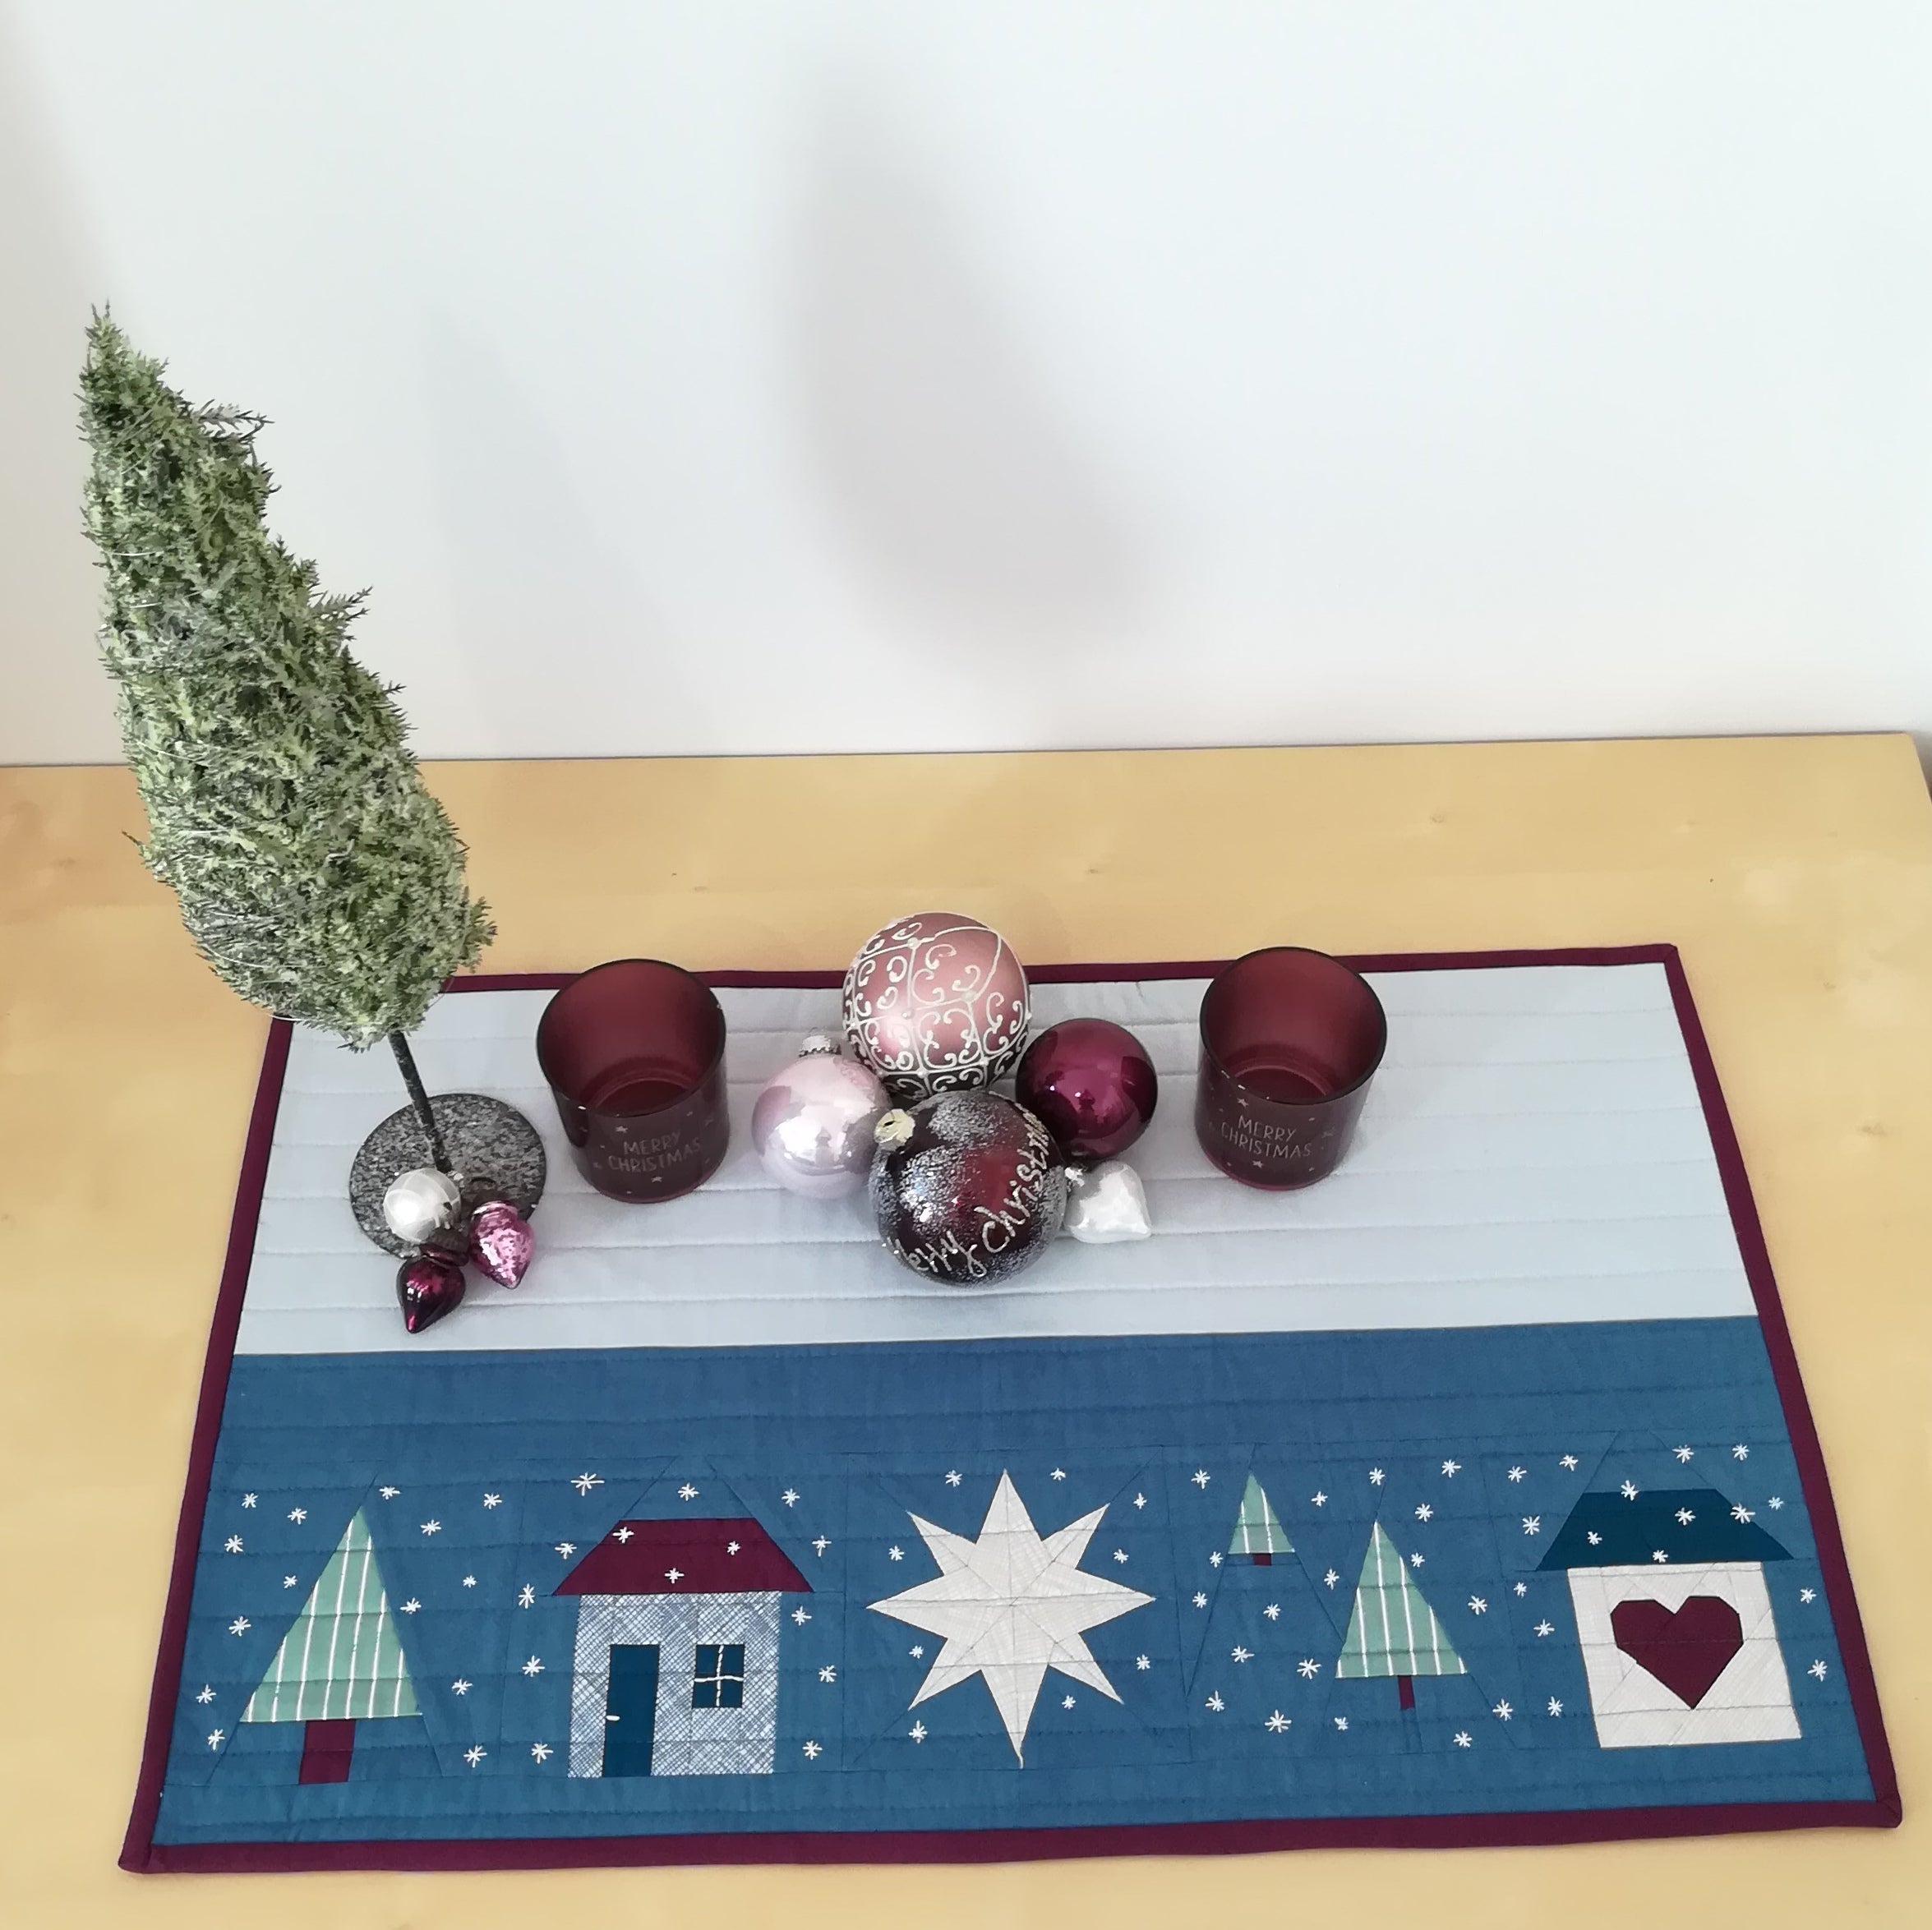
Fertige Maße:
25 inch x 15,5 inch (BxH)
Finished dimensions:
25'' x 15.5'' (WxH)
Materialliste:
FPP-Vorlagenset „Mistletoe“ von Quiltwerke
Scraps für die einzelnen FPP-Blöcke
Stoff A (ist auch Hintergrundstoff für FPP) – hier Shot Cotton Solid in Storm Cloud
Stoff B – hier Zen Grey von Moda Bella Solids für den oberen Streifen (Teil 1) und die Rückseite
Stoff C – Binding, hier Paintbrush Studios Bordeaux
Thermolam als Vlies
Stickrahmen Ø 12 cm (optional)
(Stick)Nadel
Stickgarn in weiß
Passendes Nähgarn
Schere
Lineal, Rollschneider, Schneidematte (optional Quarter Inch Ruler)
Wonderclips & Stecknadeln
Sprühkleber, ggf. gebogene Sicherheitsnadeln zum heften
ggf. Markierstift
Kleberoller (optional)
You will need:
FPP template set "Mistletoe" by Quiltwerke
Scraps for the individual FPP blocks
Fabric A (same fabric as background fabric for FPP) - here Shot Cotton Solid in Storm Cloud
Fabric B - here Zen Grey from Moda Bella Solids for the upper strip (part 1) and the back
Fabric C – binding fabric, here Paintbrush Studios Bordeaux
Batting as stabilizer
Embroidery hoop Ø 12 cm (optional)
(embroidery) needle
Embroidery thread (white)
Sewing thread
Scissors
Ruler, rotary cutter, cutting mat (optional Quarter Inch Ruler)
Wonder clips & pins
Spray adhesive or curved safety pins
marker pen (optional)
Zuschnitt:
Teil 1: Stoff B 25 inch x 7,5 inch (BxH)
Teil 2: Stoff A = 25 inch x 2,5 inch (BxH)
Teil 4: Stoff A = 25 inch x 1,5 inch (BxH)
Cutting Instructions:
Piece 1: fabric B 25’’ x 7.5’’ (WxH)
Piece 2: fabric A = 25’’ x 2.5’’ (WxH)
Piece 4: fabric A = 25’’ x 1.5’’ (WxH)

ANLEITUNG / INSTRUCTIONS
Schritt 1 – FPP-Vorlagen nähen
Näht 5 Blöcke aus den FPP-Sets Cedar, Mistletoe oder dem Schnittmuster Holly.
Step 1 - Sew FPP templates
Sew 5 blocks from the FPP sets Cedar, Mistletoe or the pattern Holly.

Schritt 2 – FPP-Blöcke besticken
Nachdem ihr die fünf FPP-Blöcke genäht habt, könnt ihr diese nun wunderbar mit ein paar Stickereien ergänzen. Der Phantasie sind hier keine Grenzen gesetzt!
Ich habe mich für Schneeflocken entschieden, in Form von einem Stern (ein einfacher Stich: zwei übereinanderliegende Kreuze. Es war für mich das erste Mal, dass ich mit kleinen Stickmustern gearbeitet habe und ich finde, das hat dem ganzen Projekt noch mal das gewisse Etwas gegeben.
Step 2 - Embroider FPP blocks
After you have sewn the five FPP blocks, you can now add some embroidery elements to them. There are no limits to your imagination!
I chose snowflakes, in the form of stars (a simple stitch: two crosses on top of each other. It was my first time working with small embroidery patterns and I think it has really added something special to the project!
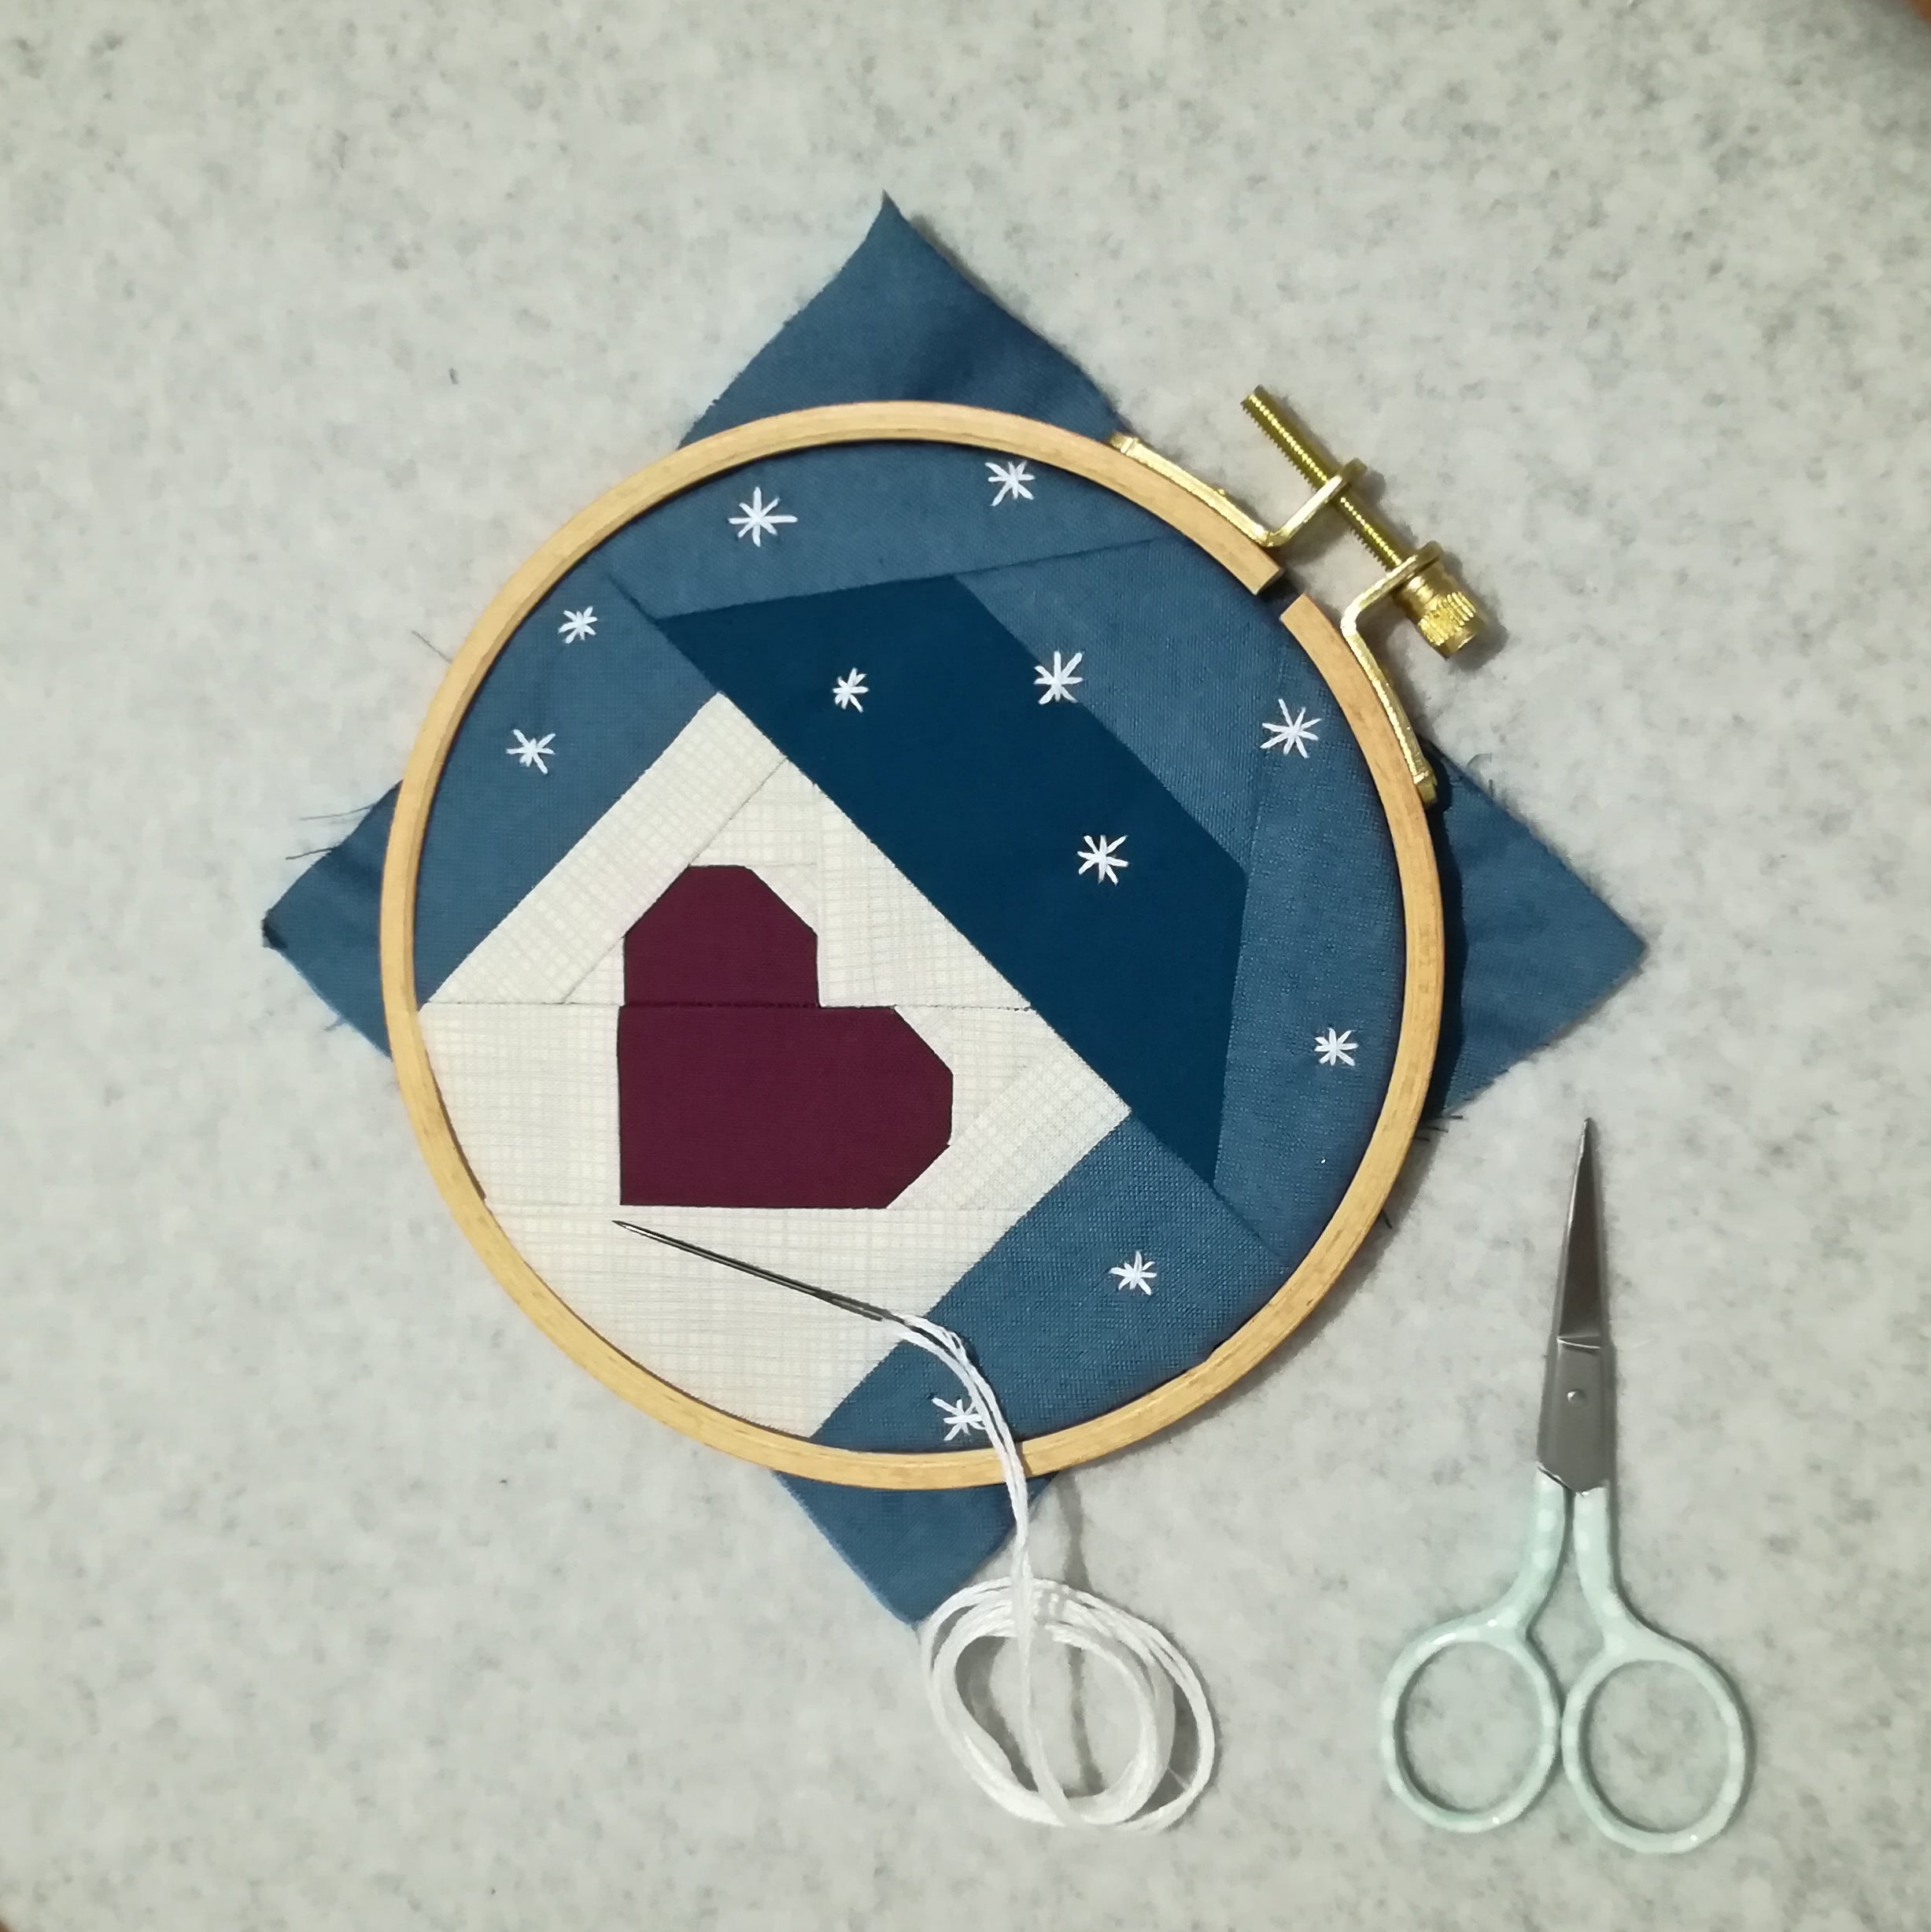

Auf YouTube findet ihr bei „Pumora stickt“ eine Videoanleitung inkl. kostenloser Vorlage zum Sticken von Sternen.
Via the YouTube channel "Pumora stickt" you can find a video tutorial incl. a free template for embroidering stars.
Schritt 3 – FPP-Reihe nähen und ggf. noch weitere Schneeflocken ergänzen
Im nächsten Schritt näht ihr die fünf bestickten FPP-Blöcke zu einer Reihe zusammen (Teil 3). Wenn euch an der einen oder anderen Stelle noch eine Schneeflocke fehlt, könnt ihr diese jetzt noch ergänzen.
Step 3 - Sew the FPP row and add more snowflakes if necessary
In the next step, sew the five embroidered FPP blocks together to form a row (part 3). This is a good time to add more snowflakes if you feel your piece needs it!
Schritt 4 – Top zusammennähen
Nun erst die Teile 1 & Teil 2 sowie die Teile 3 & Teile 4 zu Paaren zusammennähen und anschließend die Paare zum fertigen Top. Die Nahtzugaben habe ich jeweils auseinander gebügelt.
Step 4 - Sew the top together
Join the pieces 1 & 2 and 3 & 4 to form pairs. Join the pairs to your finished top. I pressed my seam allowances open.
Schritt 5 – Quiltsandwich heften und quilten
Im nächsten Schritt bildet ihr aus dem Top, dem Thermolam und dem Rückseitenstoff ein Quiltsandwich und quiltet das XL-Placemat nach euren Wünschen und Vorstellungen. Ich habe mich für horizontale Linien mit einem Abstand von 1 inch entschieden.
Step 5 - Baste and quilt
In the next step, you will make a quilt sandwich with your top, batting and backing fabric, then quilt the XL placemat to your liking. I chose to horizontal lines spaced 1 inch apart.

Schritt 7 – Binding anbringen
Anschließend noch ein Binding eurer Wahl anbringen und schon ist das XL-Placemat fertig!
Step 7 - Attach binding
Finally attach a binding of your choice and your XL placemat is finished!

Frohe Weihnachtszeit - have a lovely Christmas season!
Beatrice